Showing posts with label watercolor. Show all posts

9/1/24

Mix It Up Challenge Blog - Ink Smooshing

Hi friends - I hope this note finds you doing well. How's your weather? Ours has been hot, hot, hot...and humid! But Fall is just around the corner, BUT I'm not going to wish the days away!

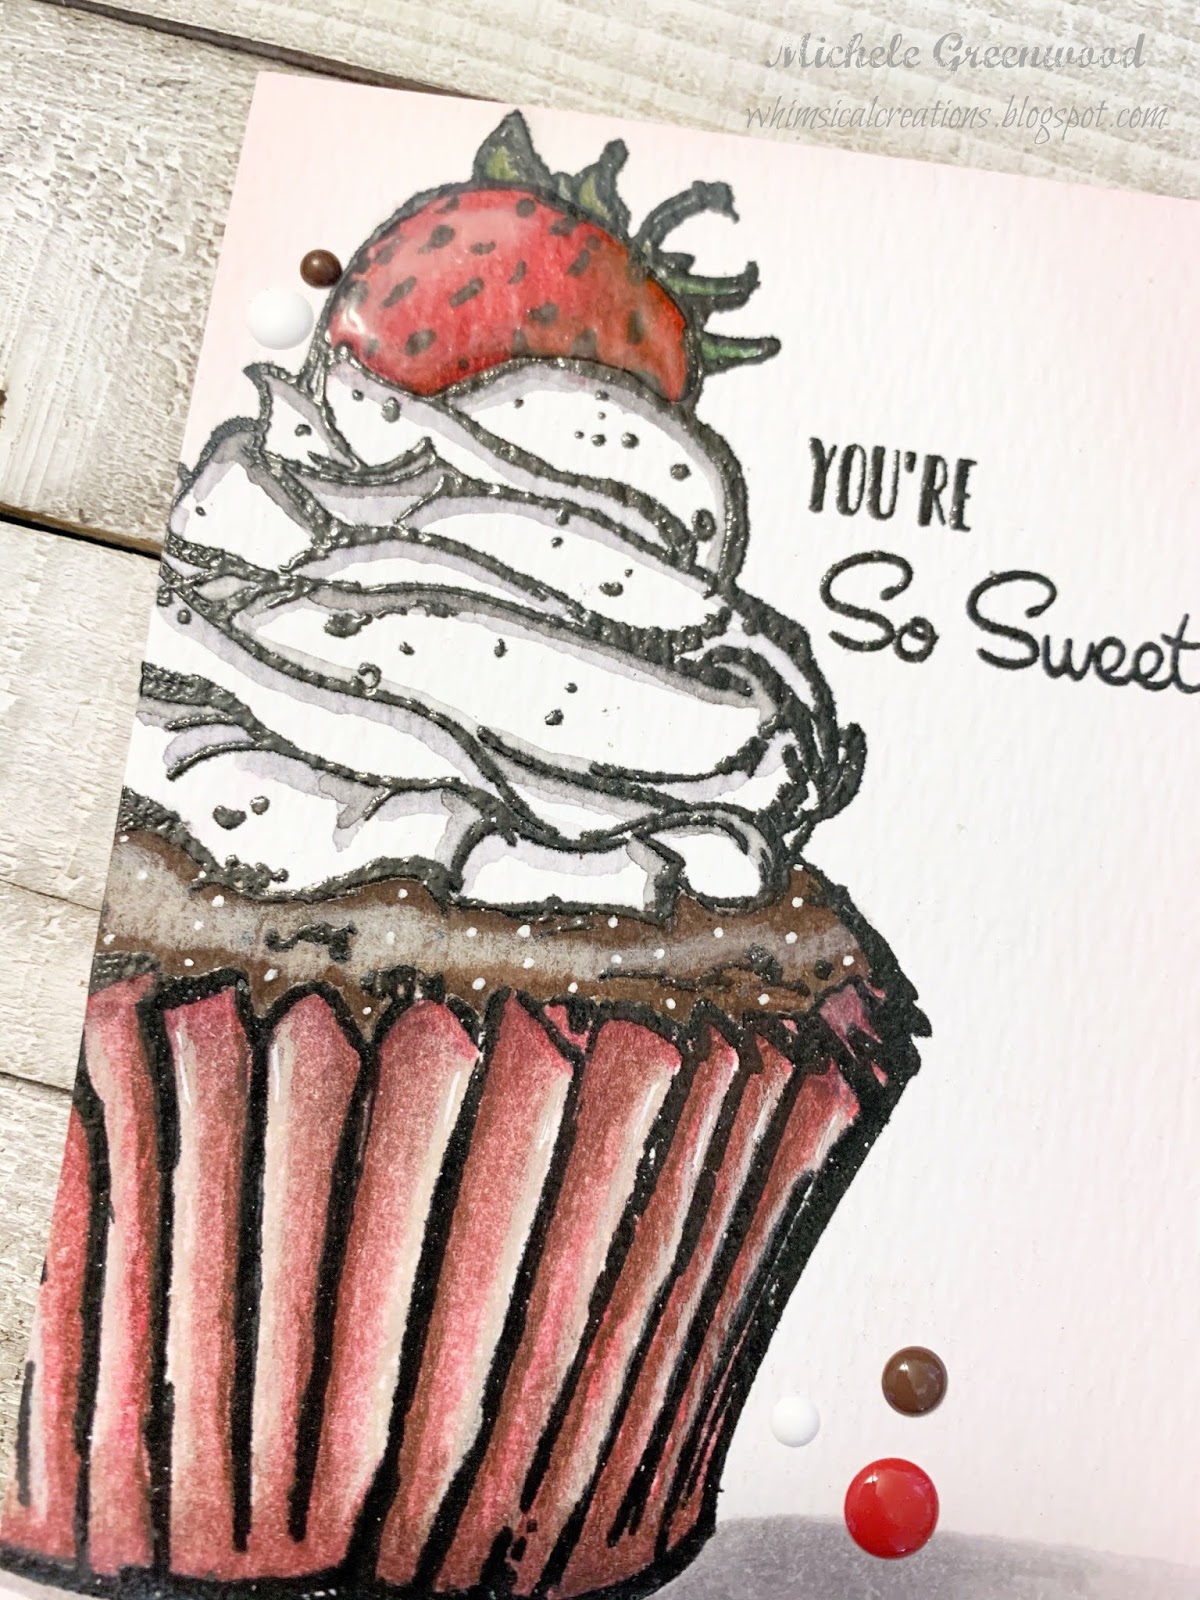
At Mix It Up Challenge, we're playing with ink smooshing - I LOVE ink smooshing and although I'm not thrilled with this card, I do love how the cupcake turned out. 😀 I used Tim Holtz watercolor paper for the cupcake; the cupcake and stencil (background) are from Pretty Pink Posh. 

I started by stenciling the background, then stamped over the top with Simon Says Stamp's YOU background stamp in a gray ink. I die cut the main panel and popped up the border.

I used Simon Says Stamp's Pawsitively Saturated inks, it's tough to see but there is hot pink, and orange in the frosting. The flower is a light pink. The wrapper is done in purples. Once dry, I dripped on some water droplets and dried with a paper towel; I then stamped circles from Reverse Confetti's Poppies stamp set onto the wrapper (Reverse Confetti is no longer in business, but this is still one of my favorite stamp sets!) 

To finish it off, I made the card into a shaker with lots of little shaker bits inside!


Thanks for stopping by - I hope you are inspired to join us with either ink smooshing OR anything goes; we enjoy seeing your creations!

5/1/24

Mix It Up Challenge Blog - Inlaid Die Cutting

Hello friends - how are you doing?

We are back at the Mix It Up Challenge Blog (MIUCB) with another super fun challenge - inlaid die cutting, so many was you can do this! I love to send birthday cards or tags, but I leave them blank so the recipient can re-use them. This is no exception!

I created a watercolor smooshed birthday tag with various Distress Inks and a retired Reverse Confetti CELEBRATE die. Rather than the tag with the Reverse Confetti set, I used the largest tag die from the Hero Arts Nested Infinity Tags. I smooshed the inks on and dried with a heat gun, I then cut the word CELEBRATE from the tag, as well as, black cardstock, and a few layers of white cardstock. I inlaid the black CELEBRATE into the tag; I then adhered the white layers to the watercolor piece and adhered the stacked CELEBRATE to the tag slightly offset to the left and down; this way you can peek the black cardstock. I also splattered some black ink for a bit more texture.

I then stamped and colored, with Copic markers, some balloons and presents from MFT's XXX set. I added some white gel pen accents and adhered a blank tag to the back for a handwritten message. I failed to capture a photo of the back of the tag, but it has the Hero Arts sentiment 'Some things just get better with age and you are definitely one of them', I love this Hero Arts birthday sentiment set - so many great sentiments!


Hope you will join us at the MIUCB with an inlaid die cutting project, or ANY project. We always love 'anything goes' creations too!

Thanks for stopping by!

5/1/23

Love to Scrap - May (Anything Goes)

 Hi friends!

Before we even begin, lets take a look at that GORGEOUS new banner over on the Love to Scrap blog; did you see it? 😍 The amazing Donna created it and I think it's gorgeous!!

OK, back to business! 😀  As always, our challenge is ANYTHING GOES, won't you join us and share your creation?

I'm still sharing lots of Christmas cards; these two took some time with the die cutting, sponging, coloring of the birds and creating the backgrounds, but so worth it. 

I LOVE this little mini bird from Papertreyink. I've watched so many of Dawn Woleslagel's YouTube videos which always inspires me to try different things with watercolor. And the pine cones and branches from The Greetery have been a favorite for several years; frames are from The Greetery too.


LOTS and lots of glossy accents and rock candy to make it all shiny and sparkly, along with some pretty sequins! I used a white gel pen for the bird's eye. Adhered all the die cuts together, found a layout I liked and glued everything to the card base. The center panel on each card is mounted with fun foam to give it a tiny bit of dimension.

I hope you join us this month, we would love to see your creations!


9/1/21

LTSCB - Anything Goes (Cup of Friendship)

A challenge that everyone loves over at Love to Scrap - ANYTHING GOES! I made this card quite some time ago - some quick/easy water coloring.

The image is from Reverse Confetti, Cup of Friendship. I embossed the image in white and simple water coloring, plenty of mistakes, but it's all about learning and enjoying the time - that's all that matters! The sentiment is from Verve Visual and no longer available, but it sure is adorable!


Thanks for stopping by; I hope you will join us at Love to Scrap, we love seeing your creations!

WHAT'S IT TAKE:

Stamps: Reverse Confetti Cup of Friendship

CHALLENGES: 

Enjoyed this post? Never miss out on future fun posts by following me!

10/1/20

MIUCB - Distressing + Anything Goes

Hi friends - welcome back to another challenge with the Mix It Up team! This month we focused on distressing, or as always, anything goes!

I created this panel a month or so ago and have struggled to cut it up - 😆! I used this video by Debby Hughes, it was so very helpful. You will see another water color panel I did where I failed to take time to build up the color...lesson learned.


I kept this card SUPER simple; I used the 'hi' die from The Stamp Market; the 'friend' is from a discontinued Verve Visual stamp set, but I loved the elegance of the font. I distressed the edges of the water color panel as well as the embossed black flag; I thought about sponging the edges but I just couldn't bring myself to do it. 😁

Thanks for stopping by; I hope you will join us at Mix It Up this month, we enjoy seeing your creations!

Take care, stay safe!


WHAT'S IT TAKE:

7/1/20

Hello - Love You Lots

Hello - how are you doing? Still feels like crazy times; I read a note today that quoted Dr. Fauci as saying the coronavirus was his worst nightmare and it's not over yet - YIKES! It indicated since 're-opening' things, 21 states have had a spike in cases, so scary!

But I'm glad you stopped by, nothing scarey here! 😉 

This month at Love to Scrap, it's everyone's favorite - ANYTHING GOES, I hope you will take some time to join us!

I die cut and watercolored several of these Roses and Foilage from The Greetery and these were a handful I had left over from another project. Once adhered together, I added white splatters, then glue and sprinkled on some chunky glitter (idea taken from Kelly Lunceford; BTW, she makes me buy things ALL. THE. TIME. - LOL). I die cut two of the Nordic Frames to layer my florals onto. I then cut multiple hellos (TSM Stacked Hello) from Neenah 110 lb. card stock, lightly sponged the top layer with TE Cupcake ink then added some duo deco foil to the bottom half of the top hello, let it dry and adhered gold foil. The Love You Lots comes from Mama Elephant Organic Blooms.


Take some time, create, relax and then join the fun at Love to Scrap!!

Hugs,

WHAT'S IT TAKE:
Links provided within post.

CHALLENGES:

5/27/20

Rainbow Mom

I created a couple variations of this card - I absolutely love it! Do you?

I used Karin markers to create the watercolor background. First, I created the green at the bottom, spritzed with water and let it run a bit; then I created the rainbow at the top, spritzed with water and allowed the colors to run much further down into the green area. I stamped the TE Beautiful Blossom flowers with Gina K Obsidian ink. I added some Copic coloring to each flower then added a heavy coat of  Nuvo Shimmer (which actually made the flowers a bit white, which looks rather cool I thought).

Once the inks, watercolor and shimmer were dry, I die cut the word MOM from PTI Smokey Shadow multiple times and one time from the main panel and layered them together. I then stamped and embossed the Happy Mother's Day sentiment in VersaFine ink and clear embossing powder. I layered the panel onto PTI true black and added a scalloped white panel to the inside.


Thanks for stopping by; hope you are having a great week!

Hugs,

Various Links Provided Throughout Post

CHALLENGES:

5/1/20

MIUCB #37 - Anything Goes or Masking

Hi friends - how is April treating you...beyond kinda crazy? I still work in our office 1-2 days per week, the rest are from home and you would think that allows for more down time, but I can promise you, it does not!

There is a small chance I was hoping working from home would allow me some craft time - maybe at lunch; but once I get started working, I just keep moving ahead! I don't have a great work space, so I use a lap desk and love it, but I literally have to force myself to get up and MOVE!!!

This month at Mix It Up, we are focusing on masking...or as always, anything goes!  I hope you will take time to join us, we enjoy seeing what you are creating!

This month, I'm showing two different cards - same 'gist' of a card, just different colors. I have really loved these stamp sets (pretty postmarks and signed and sealed, from The Greetery - and the dies (postal frames and signed and sealed), you'll see the postal die coming up in several more cards I made recently.


I water colored the background - mainly just the edges and then tossed together lots of die cuts I had on my desk. When doing multi-layering stamping, I like to make LOTS of extras, makes it easy to throw together a card last minute. I stamped a different greeting on each and mounted to the base card with fun foam. These cards were 100% inspired by Betsy Veldman, owner of The Greetery.

Thanks for stopping by; be sure to stop by the Mix It Up blog to see all the design team creations, then take the time to join the fun!

Hugs,

WHAT'S IT TAKE:
Inks: TE Inks, Variety of Distress Inks
Accessories: The Greetery Postal Frames and Signed and Sealed with a Kiss, twine, sequins

CHALLENGES:

4/1/20

MIUCB #36 - Fancy Fold

Hi friends - welcome back; so glad you are here!!

This month at Mix It Up, it's Anything Goes as always, BUT if you want to join in with the Fancy Fold challenge, we'd love to see your creations!

Let's be honest; we're friends, right? I am not good at fancy folds when it comes to cards; I'm not an engineer like Jennifer McGuire - LOL; and truth? I suck at math! So, I set about doing something a bit different for my fancy fold!

I colored up this gorgeous image from Gina K and Hero Arts, Friendship Blooms with some watercolors and finished with colored pencils. I fussy cut the image and added lots of splatters in white and black. I then cut the flowers diaganolly, folded over the ends of the image and hid the message below the flowers. I saw someone else do something similar recently and was definitely inspired! BUT...I needed a way for it to stay closed, so I added a heat embossed vellum belly band, sentiment from Altenew Simply the Best.


New manicure needed; dry cuticles from so much washing! ;) 

I sponged on colors to both white pieces (outside / inside) to tie it all together. It's truly not a fancy fold, but I still thought it was unique and fun!

Thanks for stopping by; hope you join us for Mix It Up where it's Anything Goes or Fancy Fold!

Hugs,

WHAT'S IT TAKE:
Stamps:  Gina K and Hero Arts Friendship Blooms, Altenew Simply the Best
PapersNeenah 80 lb. whiteNeenah 110 lb. white, PTI True Black, misc. Striped Paper
Accessories: colored pencils, white gouache, watercolors, black Folkart pain from Hobby Lobby, white embossing powder, MFT blueprints

CHALLENGES:

1/6/20

A Little - yet Big - Color Throwdown

I love Colorado Craft Company's Big and Bold stamp line, they have some gorgeous images! I also love inspiration from the Color Throwdown challenge blog; these two begged to be paired.

Now...am I happy with the outcome? Um...not so sure about that, but I'll tackle it again soon! I watercolored the image initially and REALLY didn't like that, so I finished it off with colored pencils and of course, some glossy accents for that scrumptious strawberry!


Hope your week is off to a great start, see you again soon!

Hugs,

WHAT'S IT TAKE:
Stamps:  Colorado Craft Company Sweet Friendship Cupcake

11/6/19

Easiest Water Coloring Possible

Isn't this collaboration image with Gina K Designs and Hero Arts gorgeous? I stamped the image on water color paper and literally splattered on various inks - I kinda, sorta (HA) painted the leaves but let the color run and mix. I sprayed the card stock a bit before splattering ink.

I sprayed the panel with sheer sparkle, added a birthday sentiment, striped paper and sequins to finish it off (forever loving black and white striped paper)!


Thanks for stopping by; have a great week!

Hugs,

WHAT'S IT TAKE:
Stamps:  Gina K and Hero Arts Friendship Blooms
Inks: VersaMark, Gina K Amalgam Jet Black

11/1/19

Mix It Up with Watercolor

Greetings friends! We're back for another fun month - Anything Goes or Watercoloring! We sure hope you will join us at Mix It Up; we truly love seeing your creations!

I LOVE this XL Tiger Lily image from Power Poppy; it's prefect for watercoloring and although I don't have near the depth and variation I would like, it was still fun! I stamped the image off the page and embossed with white embossing powder; I also added a few leaves. The image was colored with Zig Real Brush markers. The sentiment (from Penny Black) was stamped in black VersaFine and embossed with clear embossing powder. Pretty darn clean and simple!


Truly, hope you take the time to join us this month!

See you again soon!

Hugs,


WHAT'S IT TAKE:
Stamps:  Power Poppy XL Tiger Lily and Penny Black Faith

10/1/19

Mix It Up - Open Technique

Hi friends - welcome to the super fun Mix It Up challenge of Open Technique - use ANY technique you love to do!

I am not great at water coloring, but I keep trying! It's a technique I love seeing others do so inspiration is endless. That's the technique I wanted to try this month AND I used colors I never use. EEEeekkkk!!! But it turned out better than I anticipated. LOL

The large flower and leaves were previously water colored and I added some details with a sharpie; I then colored the small bud to match. Orange is not my gig, but I had this polka dot patterned paper so it just fell together after that. I cut the frame (Die Cuts and More) and then adhered it with dimension, added the floral bouquet in the bottom corner flat with a few pieces of foam adhesive under the leaves. And I love mixing colors of leaves, that's one of my favorite things!

I don't have the matching dies, so I fussy cut the images.


Hope you'll take the time to join us this month at Mix It Up and show us YOUR favorite technique!

Hugs,


WHAT'S IT TAKE:
Stamps:  SSS Delicate Flowers, MFT More Essential Sentiments
Papers: Neenah 80 and 110 lb. white, misc. designer paper

7/26/19

Thinking of You w/Altenew Garden Picks

OK; I know beyond a shadow of a doubt, there is a much quicker way to create this card - it literally took me hours. LOL Maybe that's because there was a lot of stopping and starting? Not sure; but I water colored each layer of the flowers and leaf clusters (Garden Picks) using lots of various Altenew inks, then splattered on tons of white droplets. Once the droplets dried, I spritzed with shimmer mist.

I used a wonky circle die for the focal piece blending on some worn lipstick using the TE Blender Brushes, stamping the sentiment with Gina K amalgam black ink and proceeded to layer the flowers and leaves.

The background? Man, I love it - it's Altenew's Tuxedo washi tape which is approximately 4.5 inches wide, so perfect for covering an A2 card. I used it to cover some Neenah 80 lb. white card stock, then die cut with a MFT blueprint and mounted with fun foam to the card base.


I tried to get a picture of the depth of the 3D flowers; SO. MANY. LAYERS.

I finished the card with some PPP Marshmallow Confetti. Thanks for stopping by; hope you have a great day!

Hugs,


WHAT'S IT TAKE:
Stamps: SSS Sketched Flowers