Showing posts with label Distress Inks. Show all posts

7/21/24

3D Balloons with lots of Bits and Baubles

Hey friends - how are you doing? We are having some beautiful weather of late, mid-high 80's, low 90's; I'll take that over the 100+ days ANY TIME!!

Friday and Saturday, I judged at our County 4H Fair - always fun, and long! 😊 Friday was Food and Nutrition (definitely out of my league, but I try my absolute best); Saturday was Visual Arts and that is much more in my wheelhouse. The kids are always fun and the learning experience is probably unmatched in the real world. They need to speak up, make eye contact, be able to explain what they made, HOW they made it, etc. I saw some incredible creations!

Anywho, onward we go to this card. I took all my inspiration from Lilybean Paperie; I absolutely love everything Melissa creates! This was so much fun and a whole lotta work. lol

I die cut the balloons from Tim Holtz watercolor paper and heavily shaded with Distress inks, then splattered with water, dried those drops and splattered some watered down white gouache and distress spray strains to each balloon. I cut the strings from mirror cardstock and set everything aside. 

I then die cut lots of little bits and baubles from the Hey Honeycomb Flower Power dies and Pretty Pink Posh Birthday Mug Additions. Some of the pieces I had cut previously and was able to use - can't beat that.

The sentiment is from the Four Square Birthday Tags stamp set, it's ombre - which I love. I assembled all the pieces; the balloons were mounted with foam squares, most of the bits and baubles were adhered directly to the balloons. Then I got out my white gel pen and added ALL THE HIGHLIGHTS, love me some white gel pen! 

The background is two different Bitty Bit Raspberry Fizz papers from Papertreyink. I added some shading to the top layer, and in between those papers, I added a scalloped layer of vellum, all these were cut with The Ton Nested Slimline dies (stitched and scalloped).

I sent this card to someone I love dearly for their birthday; I hope it touched their heart!


And thank YOU for stopping by, I appreciate your visit and hope this spurs you to create and mail your cards!

Have a great day!

5/1/24

Mix It Up Challenge Blog - Inlaid Die Cutting

Hello friends - how are you doing?

We are back at the Mix It Up Challenge Blog (MIUCB) with another super fun challenge - inlaid die cutting, so many was you can do this! I love to send birthday cards or tags, but I leave them blank so the recipient can re-use them. This is no exception!

I created a watercolor smooshed birthday tag with various Distress Inks and a retired Reverse Confetti CELEBRATE die. Rather than the tag with the Reverse Confetti set, I used the largest tag die from the Hero Arts Nested Infinity Tags. I smooshed the inks on and dried with a heat gun, I then cut the word CELEBRATE from the tag, as well as, black cardstock, and a few layers of white cardstock. I inlaid the black CELEBRATE into the tag; I then adhered the white layers to the watercolor piece and adhered the stacked CELEBRATE to the tag slightly offset to the left and down; this way you can peek the black cardstock. I also splattered some black ink for a bit more texture.

I then stamped and colored, with Copic markers, some balloons and presents from MFT's XXX set. I added some white gel pen accents and adhered a blank tag to the back for a handwritten message. I failed to capture a photo of the back of the tag, but it has the Hero Arts sentiment 'Some things just get better with age and you are definitely one of them', I love this Hero Arts birthday sentiment set - so many great sentiments!


Hope you will join us at the MIUCB with an inlaid die cutting project, or ANY project. We always love 'anything goes' creations too!

Thanks for stopping by!

7/1/21

Love to Scrap - Anything Goes

Hi friends! July is my birthday month, my ABSOLUTE favorite holiday! 😁 I hope I get to spend lots of time crafting!!

The challenge this month at Love to Scrap is Anything Goes; EVERYONE loves those challenges! I've gotten better at creating two-fers - you know, you have your supplies out, might as well stamp some extra things and make two cards at the same time. 

I used The Greetery Square Dance Stencil on both cards; one correctly, one not. lol Regardless, I think they both turned out great. Also, for both I used the Altenew Dotted Scales Debossing Die; on one I debossed, the other embossed. I cut the middle panel using the Pinkfresh Diagonal Stitched die and mounted with fun foam. Added some Old Paper sponging and then the layering begins! I used The Greetery Signed & Sealed stamp set and die and Mimosa Musings. I embossed the envelope for both; added ribbon to one and to the other, a sentiment on the envelope and embossing around the edges.


Thanks for stopping by; I hope you join us over at Love to Scrap!

WHAT'S IT TAKE:

Stamps: The Greetery Signed & Sealed and Mimosa Musings
Inks: VersamarkInks from TEOld Paper Distress Ink
PapersNeenah 110 lb. white, TE Lollipop (base card) and Cupcake (base card)

CHALLENGES: 

Enjoyed this post? Never miss out on future fun posts by following me!

3/1/21

Mix It Up - Inlaid Diecutting

Hi friends! It's a fun one at the Mix It Up Challenge Blog this month! We're focusing on inlaid diecutting. I love this technique, but it can easily be forgotten; and...sometimes what you have in your head just doesn't come out the same when finished - HA!

I actually created a different card before this one but just wasn't happy with it, so back to the drawing board with a different die. This is from MFT, Rose Overlay, I love this die and have used it many times - it's perfect for inlaid die cutting.

I used designer paper from Altenew, Celebrate, to inlay with the outer border being Strawberry Milkshake from Taylored Expressions. Once I had everything die cut, I stuck the 'insides' of the rose to a piece of masking paper and used double stencils for the lines and polka dots on the flower. I also used the polka dots on the leaves (that's probably my favorite thing)!! I dripped some distress ink from the top - frayed burlap and worn lipsick - once dry, assembled the card, sponged around the edges and added sequins as the final touch. The main panel is mounted with fun foam.


Hope you will take the time to join our fun challenge this month; we love seeing your creations!

Thanks for stopping by; hope you and yours are safe and healthy!

WHAT'S IT TAKE:

Stamps: SSS Spring Flowers
Accessories: TE mini slip stencil - on the dot, SSS Mega Wrap stencil MFT Blueprints, TE sequins

CHALLENGES: 

10/23/20

Hello Beautiful

Remember THIS card? Here is the other one in different colors!

I blended on a variety of distress inks, I also blended another piece in which I die cut the flower and leaves, then stamped; hence the color goes all the way to the edges. I added some darker shading with a copic and spritzed with sheer shimmer; hard to see in the photos, but super pretty IRL! 

I splattered on the same inks then layered this Bold Border Polka Dots by Papertreyink; I love the bold statement it makes!


Thanks for stopping by; hope you have a great day!


WHAT'S IT TAKE:

PapersNeenah 80 lb. and 110 lb. whiteTE Lemon Meringue (card base)
AccessoriesSheer Shimmer MistPTI Bold Borders Polka Dots, foam tape, copics

CHALLENGES: 


10/16/20

Hello Beautiful - Pink and Yellow

Another card I made months ago but haven't had the time to post, story of my life! Pandemic or not, life is still insanely busy!!

I hope you and your loved ones are doing well, safe and healthy!!

I made two of these cards in different color combos, both made the same way. I'll post the other one soon.

I blended on a variety of distress inks, mainly pink and yellow, I also blended another piece in which I die cut the flower and then stamped; hence the color goes all the way to the edges; same for the leaves. I added some darker shading with a copic and spritzed with sheer shimmer; hard to see in the photos, but super pretty IRL! I believe the sentiment is from a Gina K set; but their site is down right now, so I can't confirm. #whoops

I splattered on the same inks then layered this Bold Border Polka Dots by Papertreyink; I love what a bold statement it makes!


Thanks for stopping by; hope you have a magnificant weekend!

WHAT'S IT TAKE:

Accessories: Sheer Shimmer Mist, PTI Bold Borders Polka Dots, foam tape, copics

CHALLENGES


10/1/20

Love To Scrap - Fall Back

Hi friends - welcome back to another challenge at Love to Scrap! This month our theme is 'fall back' and hands down, there are two things I love most about fall: cooler temps and leaves changing colors. And I really love leaves that change to red, that's definitely my favorite so I used a newer to me stamp set, Mimosa Musings, and created a card offering thanks and my favorite color for fall! 

I paired the red with brown for something different, but definitely a sign of fall, don't you think? I originally stamped the large mimosa on the card front but I prefer the rule of 3, so added two smaller ones in 2nd generation stamping, same colors. 


The sentiment is stamped in TE Mocha and the inside says "I should say thanks"; I mounted the focal panel on PTI Fine Linen, then PTI Pure Poppy. I adhered everything in the upper left-hand corner for something a bit different. Added some splatters (no surprise eh?) and some clear acrylic drops.

Thanks for stopping by!! 

WHAT'S IT TAKE:

Inks: TE Mocha, Worn LipstickBarn Door and Gathered Twigs distress inks
Accessories: MFT Blueprints, clear acrylic drops

CHALLENGES

8/5/20

Water coloring through a stencil

Hi friends - how are you doing? I'm doing great - in this odd space of working from home, but also in the office a few days each week. Our office is currently doing a rotational schedule, but my role falls outside of the rotation, so I'm there a bit more random. AND the best part is I am very isoldated where my desk is, so I feel pretty safe being there.

Anywho, a couple of months ago, Amber with Altenew posted a video of water coloring through a stencil; so I gave it a try. I wanted to make a card for a very dear friend going through a dark time. I used Simon's Bouquet of Roses stencil to try the same thing. Once I water colored through the stencil and removed it, I wasn't thrilled. I added some colored pencil which I liked on the flowers, but really disliked on the leaves, LOL - so hard to please! I added some drops of Mermaid Lagoon Distress Spray and set it aside to dry. 

I cut a circle off the edge of Neenah 110 lb card stock and blended through the SSS extra large dot stencil with Broken China distress ink. I stamped the Penny Black Faith sentiment, breaking it up between the cover panel and the inside. Finished it off with several Studio Katia wedding bells sequins.

Thanks for stopping by; hope you are doing great!

Hugs,


WHAT'S IT TAKE:
Stamps:  Penny Black Faith

8/1/20

MIUCB #40 - anything goes + embossing

This month at Mix It Up, we're doing anything goes, or add embossing.

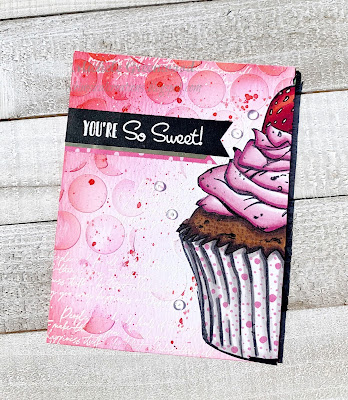
I had a BLAST making these mixed media cards; I used the Big and Bold Sweet Friends Cupcake, cut it in half to make two cards. I colored the cupcake with Copics then added those adorable pink polka dots to the 'wrapper' of the cupcake. For the base card, I embossed in white a sentiment from The Greetery, Pretty Postmarks, then applied texture paste through Simon's large polka dot stencil. Once dry, I blended on Worn Lipstick, Abandoned Coral, Picked Raspberry and Festive Berries (you will notice one is more pink (picked rasperry), one is more red (festive berries)). I flicked on some Festive Berries or Picked Raspberry, accordingly, and white guache, added the cupcake and finished with some PPP clear droplets


Pink


Red


Hope you will join us at Mix It Up this month; we love seeing your creations!

Hugs,


WHAT'S IT TAKE:
Stamps:  Colorado Craft Company Big and Bold Sweet Friends Cupcake
Inks: Gina K Obsidian, Distress Inks (Worn Lipstick, Abandoned Coral, Picked Raspberry, Festive Berries), Versamark
CHALLENGES:

5/1/20

MIUCB #37 - Anything Goes or Masking

Hi friends - how is April treating you...beyond kinda crazy? I still work in our office 1-2 days per week, the rest are from home and you would think that allows for more down time, but I can promise you, it does not!

There is a small chance I was hoping working from home would allow me some craft time - maybe at lunch; but once I get started working, I just keep moving ahead! I don't have a great work space, so I use a lap desk and love it, but I literally have to force myself to get up and MOVE!!!

This month at Mix It Up, we are focusing on masking...or as always, anything goes!  I hope you will take time to join us, we enjoy seeing what you are creating!

This month, I'm showing two different cards - same 'gist' of a card, just different colors. I have really loved these stamp sets (pretty postmarks and signed and sealed, from The Greetery - and the dies (postal frames and signed and sealed), you'll see the postal die coming up in several more cards I made recently.


I water colored the background - mainly just the edges and then tossed together lots of die cuts I had on my desk. When doing multi-layering stamping, I like to make LOTS of extras, makes it easy to throw together a card last minute. I stamped a different greeting on each and mounted to the base card with fun foam. These cards were 100% inspired by Betsy Veldman, owner of The Greetery.

Thanks for stopping by; be sure to stop by the Mix It Up blog to see all the design team creations, then take the time to join the fun!

Hugs,

WHAT'S IT TAKE:
Inks: TE Inks, Variety of Distress Inks
Accessories: The Greetery Postal Frames and Signed and Sealed with a Kiss, twine, sequins

CHALLENGES:

LTSCB #133 - Anything Goes

It's everyone's favorite challenge - ANYTHING GOES - at Love to Scrap challenge; hope you will check out all the fun creations from the design team and then join us, we love seeing your creations!

I just love smooshing inks for a background, the background made thiscard so easy to create! The Welcome Little One die and image is from Taylored Expressions. I layered up the die cuts with 4 layers of card stock and adhered them together; you can't see, but I added clear wink of stella to the top later. The image was colored with Copics. Pretty simple, but a great baby boy card.


Thanks for stopping by; hope you have a great day!
Hugs,