Pages

3/21/18

HOOT HOOT HOORAY!

Happy hump day friends; hope you are having a great week!

A friend asked for a bday card for someone that has been like a mom to her since her own mother passed, celebrating 70 years young! She loves owls and redid her barn with an owl theme, the request was for a colorful owl card, so I made sure I found lots of color. ;)

This is an adorable set from Taylored Expressions, Hoot Hoot Hooray, comes with 3 matching dies; I have had it for years and love when I have the opportunity to use it! The designer papers are from Elle's Studio; so many great options in this paper pack!


I stamped the smaller owl multiple times on some woodgrain style paper in MFT Kraft Ink; I then die cut one large and one small owl from PTI Rustic White card stock, then using a stamp positioner I stamped each in MFT Hot Fudge and colored with Copics. The background seemed a bit plain when placed against the rainbow paper so I added some of the small flowers with various Altenew inks. I die cut two branches, one from PTI Dark Chocolate, one from Kraft, ran those through the paper crimper. I accented the dark chocolate branch with PTI Vintage Cream and the Kraft with MFT Hot Fudge.

Peek of the card and the decorated flap of the envelope
I used the PTI A2 Scalloped Vertical die for the small panel and MFT Blueprints for the larger rainbow paper. I popped the owls up with foam adhesive, added white enamel dots to the eyes followed by glossy accents.

TFL; hope you have a great week!

HUGS!


WHAT'S IT TAKE:
Stamps: Taylored Expressions Hoot Hoot Hooray
Inks: MFT Hot Fudge and Kraft, PTI Vintage CreamAltenew Inks
Challenges:

3/19/18

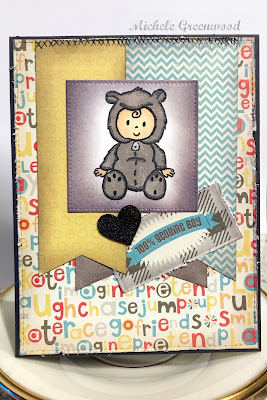
Welcome Baby Baird

A friend asked me to make a card for a co-worker that recently had a baby boy. He was born February 10; unfortunately his birth did not go well and the road to recovery has been uphill - but we are super excited to continue receiving updates of how well he is doing! You can read a bit more about his birth and the complications HERE.

I set about making a masculine baby card with lots of distressing - both with ink and tools. I paper pieced the little bear suit, I thought the star pattern paper was too cute! I added lots of lines with a pencil (Sandy Allnock did something along these lines recently to some no line colored bunnies - see video HERE), so I thought it would be fun. Had I thought in advance, I would have used a lighter ink! You might have to click and enlarge to see the details of the 'fur' created with the pencil.


I love these papers, a very old pack from My Mind's Eye, but I use them all the time in masculine cards. TFL; hope you have a GREAT week!

HUGS!


WHAT'S IT TAKE:
Stamps: LCI Baby set (discontinued)
Inks: MFT Hot Fudge
Papers: Designer paper by MME, Neenah 80 lb. white
Accessories: cork heart (colored with Hot Fudge ink), Sharpie, Heidi Swapp distressor, Copics, MFT pierced square die (similar die here), MFT Blueprints

Challenges:

3/9/18

Amped up 3D

Hi friends - happy Friday!

I have been following Marta for quite some time and am always in AWE of her creations, so many details! I watched one of her videos recently and just couldn't believe how effortless she made it look. I have a dear friend with a birthday, she loves pink; I came across these papers in an older Simon Says Stamp kit and knew I wanted to try my hand. Lots of learning curves! :D

I started by die cutting all my pieces of designer paper, then sponging everything - it's a super light color, MFT Grout Gray; I did add a bit of MFT Kraft also. I then distressed all those layers, added fun foam to the striped and polka dot panel; but before adhering those layers, I added some gesso to the very base layer, you can see it peeking out the sides. Then I used a Tim Holtz mini stencil and some translucent texture paste for the polka dot panel. I thought that alone sure was pretty.


The pink flower has been in my stash for years - *GULP* - but it sure came in handy! I then die cut leaves from MFT's Layered Leaves, and longer leaf branches from Simon Says Stamp Believe in the Season, typically a more winter/Christmas themed stamp set - but seriously, you can make these images work ANY TIME! The longer leaf stems I again stamped with either MFT Grout Gray (white card stock images) or Kraft (natural card stock images); I cut all the leaves from Neenah 80 lb. white and MFT Natural. Once everything was die cut, I searched my stash for things I might use, twine, stickers, etc. I adhered everything with Tombow Mono Multi to give me a bit of wiggle room to place pieces. I then just began adding and adding. :D Yeah - it'll never fit in an envelope - LOL!


Left Side

Right Side

Inside


Once I THOUGHT I was done, I added 3 stickers, painted some gesso on the pink flower, watered down some white paint and splattered it everywhere and then at the last minute, I added the mini clothespin.

I was a complete mess when I finished but boy I sure love the finished product, I hope you do too! Thanks for stopping by; hope you have a GREAT weekend!

HUGS!


WHAT'S IT TAKE:
Stamps: Right at Home Script Greetings (inside)
Inks: MFT Grout Gray, MFT Kraft, MFT Hot Fudge
Papers: Designer paper from SSS card kit, Neenah 80 lb. white, MFT Natural
Accessoriestranslucent texture pasteTim Holtz mini stencil, PPP Marshmallow Confetti, clothespin from Michael's, MFT Layered Leaves dies, Simon Says Stamp Believe in the Season die, Tim Holt wish ticket, heart dies - sorry, not sure who makes these, twine, fun foam, PTI A2 Vertical Scalloped die, Double Stitched Frames

Challenges:
  PP384 - any shade of pink

3/8/18

Studio Katia - Happy Birthday Wishes

Hi friends! My boss asked me to create a birthday card for his sister-in-law.

Ever have those times when you've kind of lost what kind of designer you are? Layers, more CAS, CAS but sophisticated? Yeah - that's me right now!

Anywho, I stamped the image in MFT Extreme Black and colored with Copics and colored pencils; the flowers were all coated with Clear Wink of Stella.

Once I finished coloring, I used a Tim Holtz mesh stencil to add some Squeezed Lemonade spots; I finished it off with a few colors of Nuvo drops and some washi tape.


I have MUCH better lighting at work BUT I haven't found the 'perfect' background piece yet; not thrilled with this, but for now, it'll  have to work! ;)

Thanks for stopping by; have a great week!

HUGS!


WHAT'S IT TAKE:
Stamps: SSS/Studio Katia Blooming Trio (looks like this is no longer available, but here is one EXTREMELY similar, Blooming Bunch), WPlus9 Modern Peonies (sentiments)
Inks: MFT Extreme Black, Distress Oxide Squeezed Lemonade
Papers: Designer paper (from my stash - same stash you have - HA); SU Real Red, PTI Summer Sunrise, Rangrr water color
Accessories: Nuvo drops, clear wink of stella, misc. washi tape, MFT Blueprints, Copics, Tim Holtz mesh stencil

WSU Shockers

Hi friends! Any sports enthusiasts out there? Me, me, me - I LOVE sports, all kinds of sports! If we are watching TV (which I rarely do), I always hope it's on sports; if not, you're most likely going to find my nose in a book.

A friend of mine recently asked me to make a masculine WSU Shocker thank you card - WSU has had a couple decent runs in the NCAA tournament and a couple years ago, had the slogan 'play angry' which was used EVERYWHERE! Their colors are gold and black and let me tell you, their fans are p-a-s-s-i-o-n-a-t-e!!!

So I set about creating a super simple card using Right at Home's Watercolor Background; I just love those stripes! I used Squeezed Lemonade, spritzed lightly with water and then rubbed it around with my finger for a bit of a smoother look since I was using water color (textured) card stock. After it was completely dry, I wanted a bit more of an ombre look, so I painted on some Fossilized Amber (left side).


The THANKS is from Hero Arts Thanks stamp and cut (love those sets); I die cut and stacked 5 black sentiments together, added glue across the bottom and once the glue was completely dry, I added some gold foil; the sentiment is stamped in MFT extreme black. I layered this piece with fun foam on a black base, then a yellow note card. You may be able to glimpse in the photo (just barely), the yellow envelope with some black/white and yellow washi tape included; the same colors were carried over to the inside of the card. I finished it off with some splatters of black paint.

Thanks for stopping by; hope you have a GREAT week!

HUGS!


WHAT'S IT TAKE:
Stamps: Hero Arts Thanks Stamp and Cut
Inks: MFT Extreme Black, Fossilized Amber and Squeeze Lemonade Oxide Inks
Papers: Ranger water color, PTI True Black and Harvest Gold
Accessories: black enamel accents, gold foil, PTI A2 Scalloped Vertical Die

Challenges:

3/2/18

Valentine Treat Sacks

I made 3 different Valentine treat sacks - larger than THESE and had SO MUCH FUN making these; I used the tutorial from Splitcoaststampers which includes embossing the topper AND making a handle; how stinking cute, right?

These are filled with 3 different kinds of kisses and 2 different kinds of Dove hearts. #swoon

The images are from Stamping Bella, Hearty Chicks and Box of Chocolate Chicks, colored with Copics.  The designer paper and vellum hearts are from Verve Visual and Hero Arts Nested Hearts.


Quick and simple; yet super cute! Thanks for stopping by; I have a couple more LOVE projects to share then I promise we'll move on!!

Have a GREAT weekend, friends!

HUGS!


WHAT'S IT TAKE?
Stamps: Stamping Bella Hearty Chicks and Box of Chocolate Chicks
Inks: VersaMark, MFT Extreme Black
Papers: Queen and Co Heart Throb, polka dot vellum, Reverse Confetti True Love, MFT Dots and Stripes Neutral
AccessoriesClear wink of stellaJotted Heart DieTiny Attacher, Hero Arts Nesting Heart Dies, twine, ribbon, embossing folder, PTI Scalloped A2 Vertical Die, glossy accents, Copics

Challenges: